How to easily create a JAR file in Java
If you have been surfing the web for ways to create a JAR file in Java on your device, look no more. Your search for “Different ways of creating a JAR file” has landed you in the perfect place. While working with Java or especially developing using Java, you must have come across JAR files at some point or the other. This blog will be looking at some of the easiest and most used methods of creating a JAR file in Java. By the end of this blog, you will gain a fair enough idea to be able to create a JAR file in no time. So let’s get started without further ado.
What are JAR files?
JAR (.jar) files are archive files that contain Java class and associated metadata and resources. JAR stands for Java ARchive. It’s a file format based on the popular ZIP file format and is used for aggregating many files into one. Although JAR can be used as a general archiving tool, the primary motivation for its development was so that Java applets and their requisite components (.class files, images and sounds) can be downloaded to a browser in a single HTTP transaction, rather than opening a new connection for each piece. They are typically executed within a Java environment, but they can also be opened using archive programs like WinZIP, WinRAR, and 7-Zip.
How to create a JAR file
We can create JAR files in many ways. We create a JAR file to store Java classes in a compressed format, much like a zip file. Hence, we can say that a JAR file is a portable container of classes. Let’s look at the first way of creating a JAR file.
Creating a JAR file using a text editor
We can create a JAR file by simply typing the Java classes in our text editor and saving it and then converting it to a JAR file using the command prompt.
How to:
- Open any text editor of your choice that you use or prefer to write Java programs in, for example, IntelliJ, Visual Studio Code, etc.
- Once your IDE is launched, type a Java program. Basically, we need to create a Java class because JAR files essentially store Java classes.
-
Create a Java class of your choice or use the sample code below:
public class CreateJAR{
public static void main(String[] args){
System.out.println(“Putting class in a JAR file”);
}
}
- Save your Java file by giving it the name that you chose for the class. For example, you may save it as CreateJAR.java.
- Once you have saved your Java file, open your command prompt in the same location as where you saved your Java file.
- You can also simply open your command prompt and navigate to the location where your Java file is saved using the cd command.
-
You can test that your Java program is running by using the following command and hitting Enter:
javac CreateJAR.java
- If your program ran successfully without any errors, you can convert it to a JAR file.
-
To convert it to a JAR file, use the following command:
jar cf nameOfJarFile inputFile
- For example, jar cf MyJARFile.jar CreateJAR.class.
- You have now successfully created a JAR file. It’s that simple.
Creating a JAR file using GUI in Eclipse
If you prefer a more GUI approach for creating a JAR file rather than hitting commands in the command prompt. Then you should use Eclipse for it. Creating JAR files using eclipse is simple and easy.
About: Eclipse is an IDE for Java developers and has been around for years. It contains essential tools for any Java developer, including a Java IDE, a CVS client, Git client, XML Editor, Mylyn, Maven integration and WindowBuilder. It contains a base workspace and an extensible plug-in system for customizing the environment. Eclipse is written mostly in Java and its primary use is for developing Java applications, but it may also be used to develop applications in other programming languages via plug-ins. You can download it from here.
How to:
- Launch the Eclipse IDE on your system.
- Once it is launched, navigate and open the JAR File Wizard.
- The JAR File Wizard can be found in the Package Explorer.
- In the Package Explorer, select the items that you want to export. If you want to export all the classes and resources in the project just select the entire project.
- Click on the File menu and select Export.
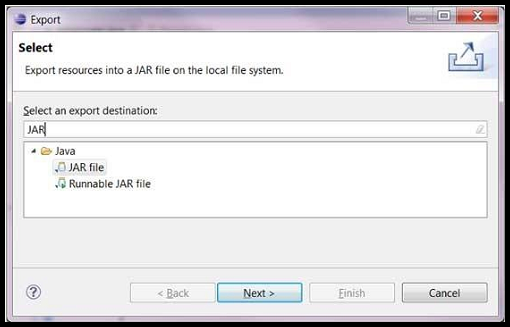
- In the filter text box of the first page of the export wizard type in “JAR”.
-
Then, under the Java folder, select JAR and click on Next.

- Next, on the JAR File Specification page, enter the JAR file name and folder.
-
The default is to export only the classes. To export the source code also, click on the Export Java source files and resources checkbox.

- Click on Next to change the JAR packaging options.
- Click on Next to change the JAR Manifest specification
- Click on Finish.
- You have now successfully created a JAR file.
In conclusion, creating JAR files can make storing Java classes and programs easier and also consume less storage on the user’s device. It also helps by making the sharing of the created JAR files easier and simpler. Plus, JAR files are also required as external library files while working with Android. Given the importance and versatility of JAR files, it is important that one should know how to create them and now we know two of the simplest ways to do so. Hope you try them out.


