Easy ways to install SQLite on Ubuntu
First of all, congratulations! Your search for “How to install SQLite on Ubuntu” has landed you in the perfect place. Here, we will be walking you through the detailed steps of installing SQLite on Ubuntu Linux.
We are now living in a world where technology and computers can be seen all over the place. With the extent of digitization now more than ever, being tech-friendly is as important as anything. Now, coding and development are not only limited to the professionals as they used to be but open to a wide number of enthusiast audiences and for anyone who has the hunger for it. Especially for the coming generation, coding and development hold more value as kids tend to speak the native language of the internet. Also, this is the reason why we have seen a reformation in the education policy of India amending a lot of things and incorporating coding and development into the curriculum.
So where everyone is now trying to develop something or the other, maybe a website or an application, any development generally requires to be connected to a database. Now, what is a database? It is a tool for storing data in an organized manner making storing and retrieving data easier and more efficient. In this process of development, there is no doubt that people sometimes encounter difficulties or issues at certain points. That’s where such handy blogs like this come to the rescue. In this blog, we will be looking at some of the easiest ways of installing SQLite on a machine running on Ubuntu Linux. We will first discuss about the SQLite Database and the Ubuntu operating system then move on to the how-to section where we will look at how to install SQLite. Although, if you already know what SQLite is, feel free to skip to the last part of the blog. So let’s get started without further ado.
The SQLite Database
Generally speaking, a database is the backbone of everything that we develop. It is used to store and retrieve data in an organized and efficient manner. Storing data inside a database is commonly known as “writing” into the database as we are entering information in the database. On the other hand, retrieving data from a database is commonly known as “reading” from the database as we are getting information from the database. Each of these writing and reading commands is called a query. While there are many databases present in the market, MySQL, MongoDB, Oracle Database to name a few, here we will be focusing on the SQLite database.
SQLite is a C-language library that implements a small, fast, self-contained and full-featured SQL database engine. The lite in SQLite means lightweight in terms of setup, database administration, and required resources. It is the most used database engine in the world. SQLite is built into all mobile phones and most computers and comes bundled inside countless other applications that people use every day. The SQLite file format is stable, cross-platform, and backwards compatible. The most noticeable features of SQLite that lead to its high popularity are:
- It is self-contained: This means that it requires minimal support from the operating system or external library making it an excellent choice for OS like Android, iOS and others.
- It is transactional: All transactions in SQLite are fully ACID-compliant.
- It requires zero-configuration: You don’t need to specifically install SQLite to use it.
- It is serverless: It does not require a server like some other databases.
Now that we have some sort of idea about the SQLite database, let’s look at Ubuntu.
The Ubuntu Operating System
Ubuntu is a complete Linux operating system, freely available with both community and professional support. It is the modern, open-source operating system on Linux for the enterprise server, desktop, cloud, and IoT. It is designed for computers, smartphones, and network servers. The system is developed by a UK based company called Canonical Ltd. All the principles used to develop the Ubuntu software are based on the principles of Open Source software development. The features, security and free software’s it provides makes it a very popular operating system amongst Linux users.
How to install SQLite on Ubuntu
Needless to say, to install SQLite on Ubuntu, you will obviously need a machine running Ubuntu, preferably Ubuntu 20.04 or higher for smooth installation. If you do not have a physical or virtual machine running Ubuntu, you can also choose to set up an Ubuntu server using the DigitalOcean Droplet from here followed by the server set-up guide from here.
How to:
-
Open your terminal.
You can also open it by using the shortcut key Ctrl+Alt+T.
-
The first step is to update your package list using the command:
sudo apt update
-
Next, use the following command to install SQLite 3:
sudo apt install sqlite3
-
Once it is installed, you can verify that it was installed successfully by running the following command and checking the version of SQLite installed:
sqlite3 –version
-
You will get an output resembling this:
3.31.1 2020-01-27 19:55:54 3bfa9cc97da10598521b342961df8f5f68c7388fa117345eeb516eaa837balt1
-
Congratulations! You have successfully installed SQLite on your Ubuntu machine.
Now that you have successfully installed SQLite on your Ubuntu machine, let’s look at how you can use it to create and manipulate databases from your Ubuntu’s terminal using the command line.
Using SQLite through Ubuntu’s terminal
Here, we will learn how to create databases, create tables, update the values in tables and read from them and more in SQLite using your Ubuntu’s terminal.
How to:
-
To create a database, open the terminal by hitting Ctrl+Alt+T and run the following command:
sqlite3 menu.db
- This creates a database by the name of “menu”. If a database named “menu” already exists then SQLite will open a connection to the existing database otherwise, it will create a new one.
-
You will get an output resembling this after running the above command:
SQLite version 3.31.1 2020-01-27 19:55:54
Enter “.help” for usage hints.
- You will now notice that your prefix in the terminal has changed to sqlite>. This means that you can now work inside your database and run SQLite queries.
- If you choose to exit without running any query, your newly created database won’t be saved. Hence, always run an empty query before closing the database if need be so.
- To run an empty query, simply type “;” excluding the quotation marks and hit Enter.
- With your SQLite database created, you can now create tables inside it. Every SQLite database has one or more tables inside it. A table consists of rows and columns and that’s in fact where SQLite stores data.
- Now let’s create a table in our menu database and some columns with data fields such as an ID, food’s name, food’s price and the estimated time taken in preparing the food.
-
Use the following command to create the table with the data fields that we want:
CREATE TABLE menu(id integer NOT NULL, name text NOT NULL, price integer NOT NULL, time integer NOT NULL);
- Note that in an SQLite command, the keywords are in upper-case while the user information is in lower-case and an SQLite command always ends with a semicolon.
- Next, let’s enter some values into the table that we just created.
-
The general command for inserting values into an SQLite table is as such:
INSERT INTO tablename VALUES(values);
-
Let’s insert three rows of values into our menu database by running the following commands:
INSERT INTO menu VALUES (1, “Pizza”, 20, 20);
INSERT INTO menu VALUES (2, “Fries”, 11, 15);
INSERT INTO menu VALUES (3, “Burger”, 16, 15);
- Now that you have entered the values in your table, let’s look at how can you read those values back again.
-
To view your table with all of the inserted values, we use the keyword SELECT:
SELECT * FROM menu;
- Here, * means “everything”.
- Running the above command will output all of the previously inserted values:
1 Pizza 20 20
2 Fries 11 15
3 Burger 16 15
-
If we want to read an entry that we entered according to its id, we use the WHERE keyword:
SELECT * FROM menu WHERE id IS 1;
-
The above command outputs the entry whose id is equal to 1:
1 Pizza 20 20 - Now that we have successfully read from our table, let’s have a look at how to update an SQLite table. By updating a table, we mean updating a row, a column or a value.
-
To create new rows and columns, we use the ALTER TABLE command. To add a new column namely “spiciness” of a food item in our menu, we use the following command:
ALTER TABLE menu ADD COLUMN spiciness integer;
-
To update values in an SQLite table, we use the UPDATE keyword:
UPDATE menu SET spiciness= 50 WHERE id=1;
UPDATE menu SET spiciness= 10 WHERE id=2;
UPDATE menu SET spiciness= 35 WHERE id=3;
- The above commands set the value of the newly added column “spiciness” for all our three entries.
-
Finally, let’s have a look at how to delete entries in SQLite. Let’s run an SQLite query to understand this better:
DELETE FROM menu WHERE time> 15;
- The above query deleted that entry from our menu database for which the value of time was more than 15, that is, the pizza entry.
-
Running the command SELECT * verifies that the specific entry was deleted:
SELECT * FROM menu;
Using SQLite through SQLite Browser in Ubuntu
For those who aren’t much comfortable with a command-line interface and prefer a graphical user interface, it is handy to install an SQLite Browser. What is an SQLite Browser you ask? An SQLite Browser is a high-quality, visual, open-source tool to create, design, and edit database files compatible with SQLite.
How to:
-
Run the following command to install SQLite Browser:
sudo apt-get install sqlitebrowser
- The above command will generate some output and prompt you to ask if you wish to continue. For this, press y and hit Enter.
- Your SQLite Browser should now be installed.
-
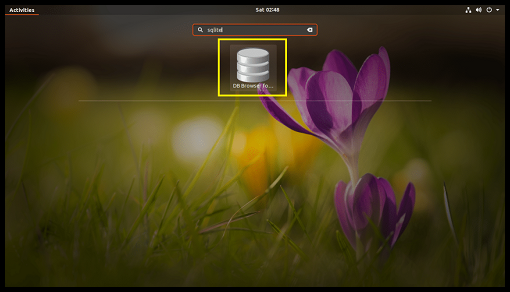
To use the SQLite Browser, navigate to your application menu and search for “SQLite Browser”.
-
Once it opens up, you should see an interface resembling this:
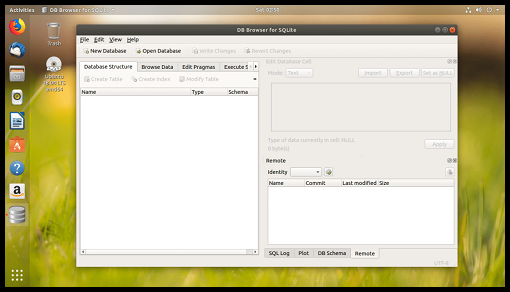
- To create a new database using the SQLite Browser, click on the New Database button.
- Next, type in a name for the database to be created and save it to a suitable location in your file system as per your convenience.
-
Once the database is successfully created, a new window will open up for creating a table.
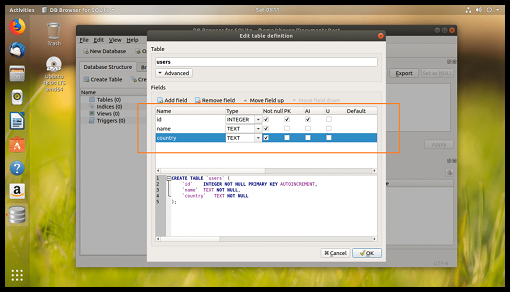
- Give a name for the table and click on Add field to add columns to your table for writing entries.
- You can add as many fields as you want but just remember to choose the right data type for each data field(Integer, Text, or other).
- If you want, you can execute SQL statements on SQLite Browser as well.
-
To execute SQL statements, first, go to the Execute SQL tab as marked in the screenshot below:
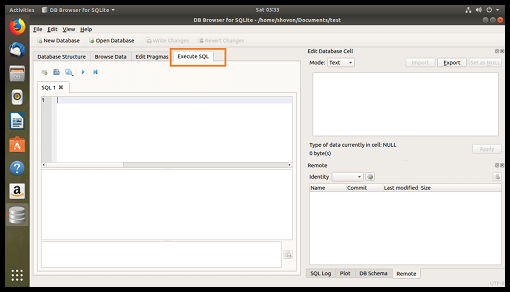
- Enter any valid SQLite query that you want to execute.
- To run your query, hit the Play button or hit the F5 key or Ctrl+R.
- The result of your query will be returned in the bottom table.
- Similarly, you can navigate and explore other cool features of the SQLite Browser and make the most out of it. The general idea is that you can perform exact same set of operations from an SQLite Browser as from the command terminal.
In conclusion, SQLite is one of the most popular databases used today and when its power meets with the simplicity and power of the Ubuntu operating system, it brings a lot of efficiency into the picture. This blog is comprised of a detailed walkthrough of how to install SQLite in Ubuntu and the ways to use it. Hope you try them out.


