Easiest ways to view SQLite Database from Android Studio
“How do I view my SQLite Database in my Android Studio?”. If you ever asked this question to yourself or were just pondering about the same, then congratulations, you are in the right place.
With the ever-growing technology, computers can be now seen in every workplace. Decades earlier, where development and coding were strictly associated with professional software developers, the same case does not hold true now. With the growing importance of computers and technology and the reformation in the education policy of India, coding and development are becoming the new normal for the coming generation of students.
So where everyone is now trying to develop something or the other, maybe a website or an application, there is no doubt that people sometimes encounter difficulties or issues at certain points. That’s where such handy blogs like this come to the rescue. In this blog, we will be looking at some of the ways that you can use to view your SQLite Database using your Android Studio. We will first discuss the SQLite Database and the Android Studio and then move on to how can the above two be incorporated to get the job done. Although, if you already are familiar with SQLite and Android Studio, feel free to skip to the last part of the blog. So let’s get started without further ado.
The SQLite Database
Generally speaking, a database is the backbone of everything that we develop. It is used to store and retrieve data in an organized and efficient manner. Storing data inside a database is commonly known as “writing” into the database as we are entering information in the database. On the other hand, retrieving data from a database is commonly known as “reading” from the database as we are getting information from the database. Each of these writing and reading commands is called a query. While there are many databases present in the market, MySQL, MongoDB, Oracle Database to name a few, here we will be focusing on the SQLite database.
SQLite is a C-language library that implements a small, fast, self-contained and full-featured SQL database engine. The lite in SQLite means lightweight in terms of setup, database administration, and required resources. It is the most used database engine in the world. SQLite is built into all mobile phones and most computers and comes bundled inside countless other applications that people use every day. The SQLite file format is stable, cross-platform, and backwards compatible. The most noticeable features of SQLite that lead to its high popularity are:
- It is self-contained: This means that it requires minimal support from the operating system or external library making it an excellent choice for OS like Android, iOS and others.
- It is transactional: All transactions in SQLite are fully ACID-compliant.
- It requires zero-configuration: You don’t need to specifically install SQLite to use it.
- It is serverless: It does not require a server like some other databases.
Now that we have some understanding of what SQLite is, let’s have a look at the Android Studio.
The Android Studio
Just like we need blueprints to design a house, similarly we need Android Studio to develop apps. Therefore, Android Studio is the official software to develop Android apps and test them on your local machine. Android Studio is the official Integrated Development Environment (IDE) for Android app development, based on IntelliJ IDEA. On top of IntelliJ’s powerful code editor and developer tools, Android Studio offers even more features that enhance your productivity when building Android apps.
To support application development within the Android operating system, Android Studio uses a Gradle-based build system, emulator, code templates, and Github integration. Every project in Android Studio has one or more modalities with source code and resource files. These modalities include Android app modules, Library modules, and Google App Engine modules.
The central concept of this blog is on how to use your Android Studio to view and manage your SQLite database.
How to view SQLite database in Android Studio
If you have an Android App connected to the SQLite database and you wish to view the database in a readable format, follow these steps:
- Open Android Studio and open the project/app whose database you want to view. Make sure that you have some or other records saved in the database to view it.
-
Connect an external device using the USB cable or use the emulator from the Android Studio. Your app should be installed on the device or the emulator. You need this to locate the database file of the app stored in the device.
Whatever device you choose, make sure it is visible in available devices:

-
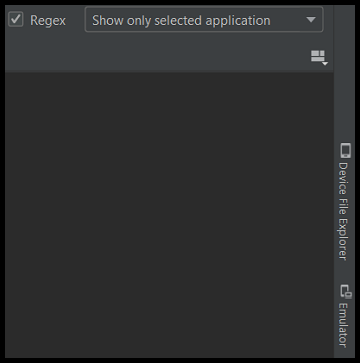
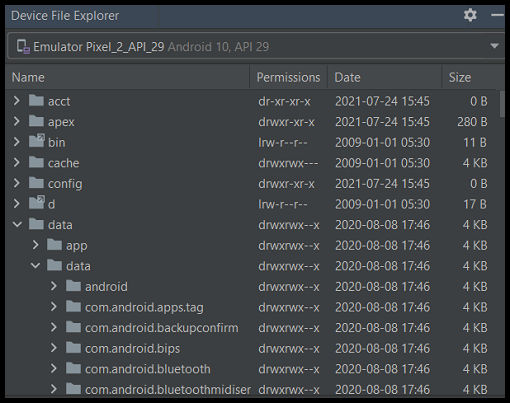
Next, click on Device file Explorer and navigate to the installed app on your device. The Device file Explorer can be found on the bottom-right corner of the Android Studio.
-
Click on Device File Explorer and navigate to the package name of your app by clicking on data -> data -> yourPackageName.
-
Once found, click on the package name and then click on the directory named databases in it. You can find a list of available databases there.

- Choose the database file with the extension of .sqlite and download it. To download it, right-click on the file and hit Save as…. Choose an appropriate filename and destination and hit OK.
- Now that you have the database file with you, you can simply view it using any SQLite Viewer.
- Here, we will use SQL Viewer Online.
About SQL Viewer Online: SQL Viewer Online is an online tool that lets you view your SQLite databases without any downloads. The best thing about this SQL Viewer is that it is completely free to use. This means that you don’t have to spend a single penny from your pockets to avail its services. This SQL Viewer is completely reliable as it does not track or keep records of any of the .sql files that you work on it. As soon as you leave, all the records and tables are erased automatically. It can also export the tables that you need in just one click and download them as excel sheets to your machine.
How to:
- Click here to open the SQL Viewer Online on your browser.
-
Click on UPLOAD FILE and choose the SQLite file that you saved from your Android Studio project in the previous steps.
You can also simply drag and drop your file.

- It will start processing your file and will show the contents of your files in seconds.
-
You can choose to execute a query or easily navigate to various tables of your database.

- You can click on EXPORT TABLE to save a particular table as an excel sheet for future reference.
Now that you know how to primarily use your Android Studio to view your SQLite database, let’s look at some more ways of doing so. These ways may be considered as a workaround to the primary way.
Viewing your SQLite database directly from the Android Studio
About: In Android Studio 4.1 and higher, the Database Inspector allows you to inspect, query, and modify your app’s databases while your app is running. It also allows you to view your database in real-time. This is especially useful for database debugging. The Database Inspector works with plain SQLite and with libraries built on top of SQLite, such as Room.
However, the Database Inspector only works with the SQLite library included in the Android operating system on API level 26 and higher. It doesn’t work with other SQLite libraries that you bundle with your app.
How to:
- Open Android Studio and open the project/app whose database you want to view. Make sure that you have some or other records saved in the database to view it.
-
Connect an external device using the USB cable or use the emulator from the Android Studio. Whatever device you choose, make sure it is visible in available devices:

- Run your app on a physical device or an emulator running API level 26 or higher.
- On the menu bar, click on View -> Tool Windows -> Database Inspector.
- The databases in the currently running app appear in the Databases pane. Expand the node for the database that you want to inspect.
- Each database consists of table/tables. Double-click a table name to display its data in the inspector window to the right. You can click a column header to sort the data in the inspector window by that column.
- If you want the Database Inspector to automatically update the data it presents as you interact with your running app, check the Live updates checkbox at the top of the inspector window. However, doing so will make the database read-only for the moment.
Viewing your SQLite database using ADB commands
About: Android Debug Bridge (ADB) is a utility of command prompt for multi-purpose that helps to get access to Android devices. It allows you to use various functions of your Android device. Although, you would need to install ADB if not already installed. Also, this method will only work with a physical Android device and not on an emulator. This method is mainly centric to command-line and is, therefore, a suitable alternative to those acquainted with the command-line interface.
How to:
- Install the Android SDK tools if not already installed. You can install it on your Windows by clicking here, on macOS from here and on Linux from here. The rest of the process remains the same for all three.
- Extract the zip folder into an easy-access location such as C://PlatformTools.
- Navigate to the extracted directory and open a command prompt in the same directory as your PlatformTools.
- Next, enable USB debugging on your Android Device from Developer Options. To unlock Developer Options, go to Settings->About Phone and tap seven times on the Build Number.
- Connect your Android device to your PC using a USB cable and open the command prompt in the same directory as your PlatformTools.
- Enter the command adb devices to get the list of your devices.
- You should see your Android device in the output of the above command. This ensures that your device is connected.
-
Next, connect a shell to your device by running the following command:
adb -s emulator-xxxx shell
Replacing emulator-xxxx with the device name as shown in the output of the command adb devices.
-
Then navigate to the directory containing your database file as:
**_cd data/data/
/databases/_** -
Run SQLite3 command to connect to your database:
**_sqlite3
.db_** -
Finally, run SQLite3 commands that you like. For example:
Select * from table1
- You can further find a list of helpful ADB commands from here.
Therefore, these were a few of the ways of viewing and managing your SQLite database from your Android Studio. All the methods discussed above work efficiently and effortlessly. So you may choose the one that best suits you and we hope you try them.


